
I got the shot above at a recent photowalk where we visited the East India Man Götheborg. I used a Sigma 10-20mm super wide angle zoom while on the ship, and I left it on for the rest of the walk.
Yes, I know, most people use slightly longer lenses for nature photography, but, as they say, the best lens is the one you have with you.
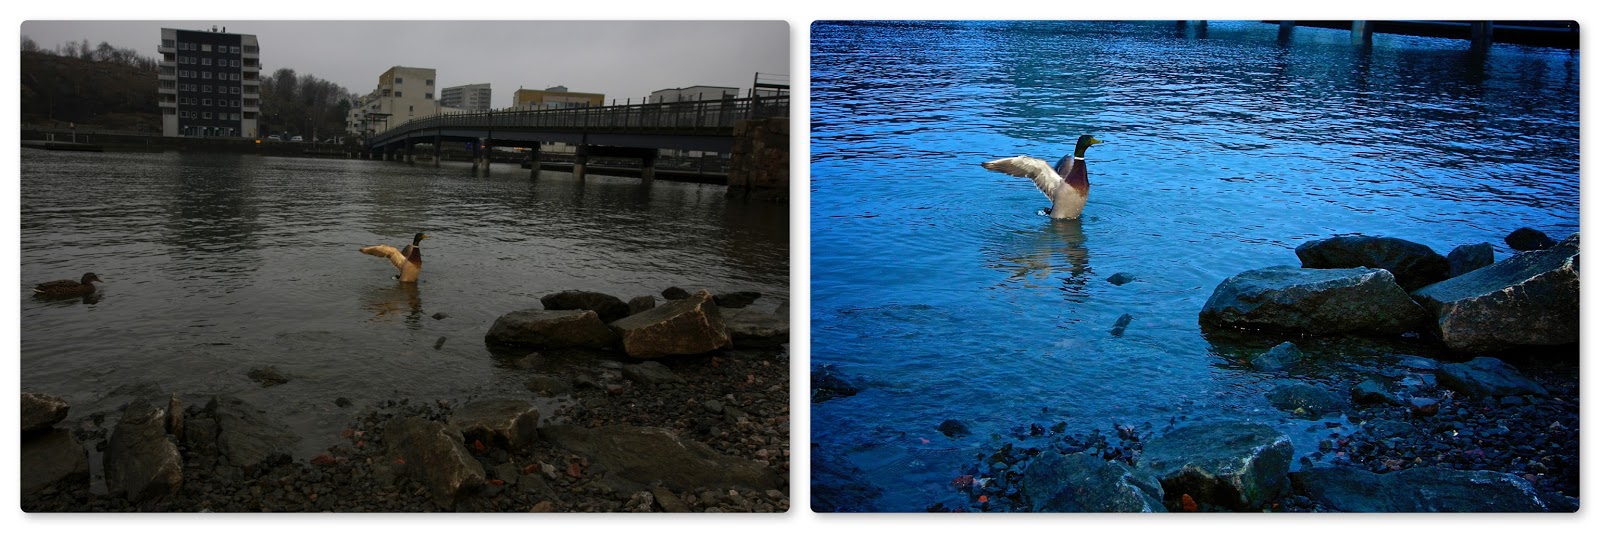 |
| Click on the photos to see a larger side-by-side comparison |
Because the original, unprocessed photo looks so different from the finished version, it might be interesting to have a closer look at how I did it.
Getting the shot
This was a photowalk, and I was by no means the one to discover the bird. There were a couple of people shooting it when I arrived. Everyone used sane lenses of course, and could photograph the bird without startling it.I knew could not do that. I had to get a lot closer. I would almost certainly startle the bird, so I probably would not get more than one shot. On the other hand, if the bird raised its wings, it could be a fairly good shot.
Lucky for me, I had decided to shoot outdoors with a hotshoe flash, and I had put a full CTO (Color Temperature Orange) gel on. Gothenburg can be incredibly gray, and I wanted to warm my photos up quite a bit.
I waited until the other photographers had gotten their shots (at least I want to believe I did...), zoomed my lens out to an awsome 20mm, and then slowly walked towards the bird. I had my camera in one hand, and my flash, on maximum power, in the other.
It worked perfectly. The duck started flapping its wings, and I took the shot. As you can see in the original, unprocessed version, the flash colored the bird orange, but did not do much with the drab, gray surroundings.
Post processing: Bringing the color out
I shoot in RAW format most of the time. This has several advantages. One of them is that I can change the white balance after I have taken the shot.I imported the photo into Aperture. The first thing I did was changing the white balance. I set the White Balance adjustment to Natural Gray, and clicked an orange part of the wing.
Bang! The photo changed color dramatically. Suddenly, the water was blue.
Looks like magic, but it is not. I colored the bird wing orange with my CTO gelled flash. Orange is a combination of red and yellow.
What I told Aperture to do when I clicked on the wing was to make the orange wing gray. How can Aperture do that? By reducing the red and yellow to the same level as the blue component.
What happens in the gray parts of the photo? Well, the red and yellow get reduced there too. What's left when you remove a lot of red and yellow? A lot of blue is left.
Hence: Blue water with normally colored duck.
I did some minor fixes, like removing a bit of residual orange from the wing, and making the beak a bit more orange by painting it with a saturation brush. I also added a vignette, increased overall Saturation and Vibrancy, and sharpened the photo a bit.
Not to forget, I cropped it as heavily as I dared, to bring the duck a bit closer. As you can see, I followed the rule of thirds convention.
I did more small lighting tricks during the photo walk. I'll write about them in forthcoming posts.
No comments:
Post a Comment