Showing posts with label photo walk. Show all posts

Monday, 3 March 2014

Going blue: A cool white balance trick


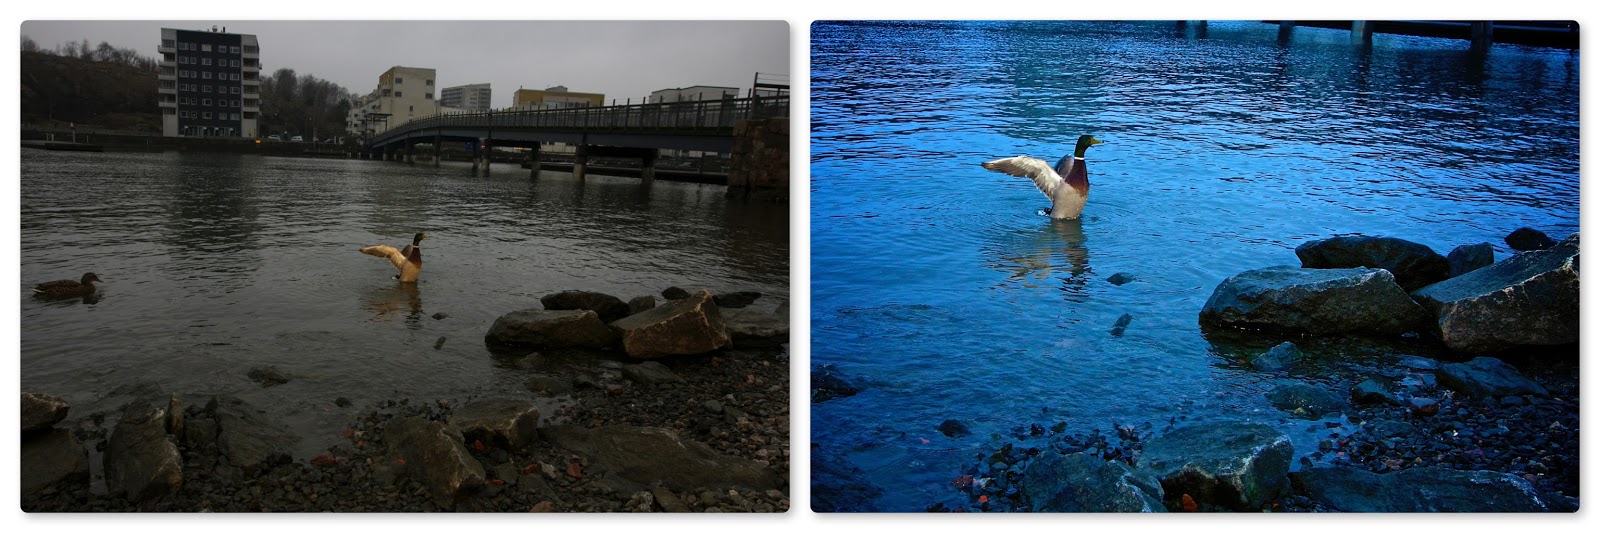
I got the shot above at a recent photowalk where we visited the East India Man Götheborg. I used a Sigma 10-20mm super wide angle zoom while on the ship, and I left it on for the rest of the walk.

Yes, I know, most people use slightly longer lenses for nature photography, but, as they say, the best lens is the one you have with you.

Click on the photos to see a larger side-by-side comparison

Because the original, unprocessed photo looks so different from the finished version, it might be interesting to have a closer look at how I did it.

Getting the shot

This was a photowalk, and I was by no means the one to discover the bird. There were a couple of people shooting it when I arrived. Everyone used sane lenses of course, and could photograph the bird without startling it.

I knew could not do that. I had to get a lot closer. I would almost certainly startle the bird, so I probably would not get more than one shot. On the other hand, if the bird raised its wings, it could be a fairly good shot.

Lucky for me, I had decided to shoot outdoors with a hotshoe flash, and I had put a full CTO (Color Temperature Orange) gel on. Gothenburg can be incredibly gray, and I wanted to warm my photos up quite a bit.

I waited until the other photographers had gotten their shots (at least I want to believe I did...), zoomed my lens out to an awsome 20mm, and then slowly walked towards the bird. I had my camera in one hand, and my flash, on maximum power, in the other.

It worked perfectly. The duck started flapping its wings, and I took the shot. As you can see in the original, unprocessed version, the flash colored the bird orange, but did not do much with the drab, gray surroundings.

Post processing: Bringing the color out

I shoot in RAW format most of the time. This has several advantages. One of them is that I can change the white balance after I have taken the shot.

I imported the photo into Aperture. The first thing I did was changing the white balance. I set the White Balance adjustment to Natural Gray, and clicked an orange part of the wing.

Bang! The photo changed color dramatically. Suddenly, the water was blue.

Looks like magic, but it is not. I colored the bird wing orange with my CTO gelled flash. Orange is a combination of red and yellow.

What I told Aperture to do when I clicked on the wing was to make the orange wing gray. How can Aperture do that? By reducing the red and yellow to the same level as the blue component.

What happens in the gray parts of the photo? Well, the red and yellow get reduced there too. What's left when you remove a lot of red and yellow? A lot of blue is left.

Hence: Blue water with normally colored duck.

I did some minor fixes, like removing a bit of residual orange from the wing, and making the beak a bit more orange by painting it with a saturation brush. I also added a vignette, increased overall Saturation and Vibrancy, and sharpened the photo a bit.

Not to forget, I cropped it as heavily as I dared, to bring the duck a bit closer. As you can see, I followed the rule of thirds convention.

I did more small lighting tricks during the photo walk. I'll write about them in forthcoming posts.

Wednesday, 26 February 2014

Two days with the Sigma 10-20mm f/3.5 EX DC HSM super wide angle zoom lens

Test subject one: My son playing Club Penguin. He is not sad, just focused on the game, and a little bit annoyed with me removing framed photos from the wall, clearing off the table, and moving the computer to get just the right angle. The wide angle lens distorts perspective, creating the illusion of an enormous computer and a rather small boy.
 I bought a Sigma 10-20mm f/3.5 lens recently, and decided to spend a a couple of days getting acquainted with it. It turned put to be quite an adventure. I learned quite a bit. The very first thing I learned:
Do not wear a hat while shooting with a super wide angle lens!
If you wear a hat while taking a shot like this, your hat will fall off.
Working with a 10mm lens is a lot different from working with a 30mm or longer lens. With a longer lens, you usually want straight lines to be straight. With a super wide angle, the whole point is to have a lens that can distort perspective. To do this, you will need to tilt the camera up or down while shooting. If you tilt the camera up, for example while shooting a tall building, your hat will fall off!

Extreme angles – high or low, and strong leading lines are important when using a super wide angle lens.
The first day I did not really have time to do much testing. Work and playing with my son had priority.

The day after, I decided to take a long photo walk, and put the lens to the test.

High angle, with a slight downwards tilt – you can make even dull, ordinary things look interesting by distorting the perspective. I got the shot by putting the camera on a monopod and raising it as high as I could.
My first stop was at the Gardening Association in Gothenburg. No flowers to shoot there this time of year, but there are other things, like this lift.

When I bought the lens, I also bought an important accessory: A monopod!

Why on Earth would I want a monopod for a wide angle lens? Aren't monopods for tele lenses? Well, yes, but I did not buy the monopod to reduce camera shake. I bought it to extend my reach, so I can shoot from interesting angles.

I shot the lift by putting the camera on the monopod, so I could lift the camera high in the air. My Canon 60D has an LCD screen that can be angled, so I see what the camera is pointing at, even when it is two meters above my head. (I bought the 60D because the LCD screen makes it eminently useful for trick shots of various kinds.)

I used the self-timer on the camera, and focused manually. Autofocus does not work well when the camera is wobbling on a long pole.

Here is a thoroughly conventional wide angle shot.
 There is a spot in the park where you can see two buildings with reflections in the water, if the day is calm. Well, I was lucky. It wasn't windy, and thanks to the wide angle lens, I could get both buildings and the reflections in a single shot.

This is a thoroughly conventional shot, but there are still some things to take note of. In particular, take care with the edges of your shot. There are trees in the park, and some of them have rather long branches. I had to compose the shot carefully to avoid branches poking in at the edges.


When I had left the park I saw some divers in the canal. It turned out to be the Gårda Fire Department that was out practicing.


With a 10-20mm lens you need to get close, so I simply asked if it was ok to shoot while they were practicing. It was. I got some nice shots.

I made a mistake though. I should have lain down flat on the ground and shot slightly upwards, to get a more interesting angle for the shot of the diver.

Well, the next time I shoot a diver, I know what to do.

I met an interesting character while visiting the Science-Fiction Bookstore.
In this shot, you can see the difference it makes when you shoot from a low angle and tilt the camera up.

In Sweden, there is a yearly book sale that is quite an event. Lots of people who don't normally read books rush out and buy them, in order to not read them.

I usually do not participate in the frenzy, because I am stocked with books that I do read all year round. However, you can sometimes find a gem or two at the sale, so I sometimes do visit a bookstore or two.

I got the alien shot at the Science-Fiction Bookstore. My favorite bookstore in Gothenburg.

I went to Domkyrkan, the largest church in Gothenburg, to take panorama shots. The plan fell through because of the church is undergoing quite extensive restauration.

I settled for a less exiting shot of a candle, and decided to save the panorama shots for another day, and another blog post.

My son was happy to see me when I turned up at his school.
A basic rule of child photography says never, ever, shoot downwards! In most cases, it's a good rule. If you shoot downwards, you will shoot at the same angle you normally see children, and you will get boring shots.

However, with a wide angle lens, you can break the rule with good results. The perspective distortion lends interest to the shot. Even more important, if you can catch a great expression like the one my son has in this shot, you can get away with almost anything.


If you want to go a bit artsy, and focus on form, a wide angle lens is great. The most difficult part was keeping my own feet out of the picture. I used a filter built into my camera to turn the photo black and white.

The public library in Partille
One more example of going high and tilting down to distort lines and lending visual interest to a photo.


In the evening, I went to a meeting with the Lerum photography club. I took this shot on my way to the train. The lens makes the bridge look a lot longer than it really is.

When I got to the meeting, I took a shot of the building before going in. I placed the camera at ground level, and tilted it a bit. 
The 10-20mm range is more versatile than you might think. At 10mm I can cover most of a large room in a single shot. At 20mm I can get a fairly close shot without standing nose-to-nose with my subject.
The shots from the meeting are interesting only if you were at the meeting, so I'll be brief. After two days of thoroughly enjoyable testing, I am quite smitten with the lens. I like it a lot, and I know I can get great shots with it.

You might be interested to know that I lit the photos in the collage with a single Nissin Di866 Mk II flash. Thanks to the white walls, that was all the light that was needed.

Sigma has two 10-20mm lenses. The one I bought is the f/3.5 version, which is slightly more expensive than the other f/4-f/5.6 variable aperture version. In my opinion, getting the f/3.5 lens is worth it. I know I will be shooting indoors in less than ideal lighting conditions, so I need that extra bit of light sensitivity.

After two days, I have just begun to put the lens through its paces, so I have more fun testing to do in the near future.

Monday, 21 October 2013

Drink and Click in Gothenburg


Photo walks are a great way to meet other photographers and have some fun. Here are some pictures from a Drink and Click event in Gothenburg.


Set the shutter time to 0.3 seconds, steady the camera by holding it against a street light, wait until something fast moving comes along, and CLICK!


Two walkers.


Booh! Halloween is coming up.


Saturday, 25 May 2013

Drink-and-Click in Gothenburg

Akram Ahmet posed in front of the camera, while I held the flash and clicked.
I was at my first Drink-and-Click yesterday. Drink-and-Click is a kind of super relaxed photo walk, where you walk from one watering hole to another, taking pictures in-between watering holes. Or, sometimes, in the watering hole.

I should point out that the "drink" part of the name does not refer to alcohol. I stuck to Coca-cola and Ginger Ale. Drink-and-Click is about meeting socially, taking pictures together, and talking about photography. And that we did.

The Gothenburg Drink-and-Click group maintains pages on Facebook and Google+. The event I went to has a G+ event page with some beautiful pictures.

My leading line contribution.
The evening had two themes:

Leading lines was the official Drink-and-Click theme. The second theme was long exposure photography.

One of the greatest features of the evening, was a pit stop at a restaurant. We had a nice dinner, and talked long exposure photography.
As it turned out, while several of us shot pictures with leading lines, the topic we talked most about was long exposure photography.

I went for light painting as an added extra. If you follow this blog, you already know I use the Cheng/Ch'i principle in my photography. Cheng/Ch'i (orthodox/unorthodox) is a military principle, from Sun Tzu's The Art of War, that says victory comes from a mixture of orthodox and unorthodox maneuvers.

Translated into photography, Cheng/Ch'i means a good picture should surprise you a bit. Or, if you have a collection of "orthodox" pictures, add one or two with a bit of extra oomph.

One interesting topic that came up, is how to select the pictures you want to show. For example, during the evening, I shot about 100-200 pictures. Out of those, I selected twenty-six that I transferred from my camera to my computer. Of those twenty-six, I selected eight that I like. From those, I chose three for this article.

That is pretty heavy culling. There are two more pictures that are good enough for publishing, but the style is different from the pictures you have seen here, so I am saving them for another blog post. And, there is one picture I like a lot, except there is way too much noise in it.

As a photographer, culling like this is difficult to do, but it does improve the end result, a lot. It is also technically easy: You do not have to know anything about image editing in order to not show an image. technically is even easier and more effective than cropping. Emotionally, it is darn difficult.

Why not have a look at your own pictures. What if, out of a hundred pictures, you showed only the five best ones? Think about it. How much better would your pictures look?

Monday, 6 May 2013

Squirelks and Treecocks at the Children's Zoo


If you have children, it's the time of year, here in Gothenburg at least, when you start bringing them to the children's zoo. This is one of the few times you may be actually asked to bring your camera, as opposed to the more usual "do you really need to lug around that?"

The answer is obviously yes. I need to bring my camera for the same reason my seven year old son needs to bring his latest LEGO Chima toy. On top of that, I also shoot pictures. I don't really understand the reason for the question...

There is another question that matters though: How do you take interesting pictures at a children's zoo?

Let's list the problems you have to deal with:


  • Competition: Everyone shoots at the zoo. Your pictures will have to compete with those of your friends, aunt Ellen, uncle Harold, your significant other, every other relative you have, perhaps including your own children, if they are old enough to hold a camera.
  • Distance: A zoo is designed to keep humans and animals at some distance from each other, for the protection of both.
  • Angle: Many zoos are designed so that the walking paths are higher than the animals. This makes the animals easier to view. Unfortunately, getting a good shot while pointing your camera downwards at a 45 degree angle is all but impossible.
  • Unflattering light: I don't know who came up with the idea of going to the zoo, or outside, in bright sunlight, but they should apologize. A lot.
  • Uncooperative animals: Most of them will just flat out refuse to do anything interesting while you are standing there. Before you arrive, and after you leave, thats another matter...
  • The people you are with: When you finally find something interesting to shoot, they will start hollering at you to come and view something boring. Or, they will ask you to take an uninteresting picture where they pose for you in harsh sunlight.

Let's deal with these challenges one at a time.

Treecocks are more interesting than peacocks. However, this is not a good photo. Both the foreground and the background have too many distracting elements. The only appealing factor is that the peacock is up a tree.
Competition: You can deal with the competition by taking more interesting pictures than they do. To do this, walk slowly, camera ready to shoot, and look for animals, and people, who do interesting things.

For example, a peacock in a tree is more interesting than a peacock on the ground. That is because you rarely see peacocks climbing trees. At least I don't. For all I know, peacocks in the wild may be the monkeys of the bird kingdom, but I doubt it.

The treecock picture is not a good picture in many other respects: bad lighting, to busy foreground, to busy background...

The fix for that is easy: Get in closer.

According to the famous photographer Robert Capa: "if your pictures aren't good enough, you're not close enough." Capa was a war photographer, but the advice holds at the zoo too. Compare this picture to the previous peacock picture. Which one do you think is the more interesting?
Distance: This peacock picture is a lot more interesting than the treecock. I shot it with an 18-135 mm lens, at a distance of less than 50 cm.

To get a shot like this, you can get a 300 mm lens, or you can pay close attention to what happens on the other side of the fence separating you from the animals. It is very likely that you can find at least a few spots that allow you to come very close to the animals.

Note that I bent down low, and took the shot at the peacock's eye level. It's amazing how many photographers that do not have knee joints. Mine are creaky, but they still work most of the time. When I use them, I get better shots.

Shoot from a low angle. Get as close as you can. Don't be afraid to crop the picture afterwards, to get even closer.
Angle: To get this squirrel shot, I lay down flat on the ground. This gave me dirty clothes and a good angle to shoot from.

From the squirrel's point of view, it made me the most interesting human in view. At one point, I started fiddling with camera settings, and that is when the squirrel decided to have a really close look at me. Unfortunately, my lens wasn't fast enough to follow the little critter when he ran directly towards me, so I missed that shot.

Still, I am pretty happy with the shot I got. I am sure I'll get more opportunities to get a really good squirrel portrait this summer.


An added benefit to getting in close is hiding that you are shooting at a zoo.


Unflattering light: Wedding photographers often use flash in broad daylight to soften shadows. Very bad idea when you are shooting animals. However, there are things you can do mitigate the effects of too strong sunlight:
  • Crop the overexposed parts away. Very often, you have got an overexposed sky, or an overly bright background, that you can crop during post processing.
  • Reduce exposure. You can either underexpose a bit while taking the picture, or do it later in post. It is amazing how much this can improve a picture. For example, the squirrel picture in this article had some blown out areas that I could bring back simply by reducing the exposure setting in Aperture.
  • Increase saturation and vibrancy. This can bring back washed out colors. Go easy on it, unless you want to oversaturate on purpose.
It is amazing how much life you can bring back into a photo by doing these simple things. What is even more amazing, is that few people do.

Don't get me wrong: There are perfectly valid reasons for not fiddling with a photo after you have taken it. But, if you look at it, and see that it has potential, but isn't quite what you would like it to be, you should give it a go.

Even if your post processing goes horribly wrong, and it will at first, you will learn something, and probably have a good laugh in the process.


Uncooperative animals: If the animals absolutely refuse to cooperate, shoot something else. 

If you are alone, you may be able to just wait them out, until they finally do something interesting. If you are in the company of children, friends or family, you probably can't do that. Not for long enough.

Don't get hung up just because you planned to shoot animals, or your children petting animals. If you don't get what you came for, get something else. Focus is a good thing, but do not focus to the point of excluding good opportunities.

Brace yourself, because I am about to show you how not to photograph the people you are with:

This is the kind of shot you will almost certainly be asked to take. It is probably not the shot you want to get, and it is not the shot they will enjoy looking at later. My advice is to take it, and give it your very best. You will have happier company, and more opportunities to get shots they will enjoy viewing later on.

The people you are with: First of all, remember that you went there with other people because you like them. For some reason, often unclear, they like you too, despite your camera.

You do have the option of putting your camera away and just enjoying your time with them. 

You can always come back another time to enjoy the solitary pleasure of zoo photography. Or, if you crave company that is twisted in the same way you are, ask another photographer to come along.

In my case, my son and ex-wife are fairly tolerant, so shooting at the zoo went very well. On the other hand, we played miniature golf afterwards, and then I put my camera away. (I admit it, I tried to play with my camera in hand at first, but it just did not work.)

Be ready to shoot when the moment comes. This takes practice. Because I need to compete with some really good professionals, I practice three times a day, in addition to professional work. The trick to practicing is making it fun. Play around. Then, when the moment comes, you'll be ready. Well, sometimes...
Sooner or later, the people you are with will ask you to take a picture of them. It is unlikely that you will be able to take a good picture. Do it anyway, do it cheerfully, and give it your very best.

If you do that, everyone will relax and be happy. This increases the chances of you getting a better shot, a shot they will enjoy looking at later.

Sunday, 3 March 2013

Photo Walk

I made this comic after a very fun photo walk in Gothenburg.