Friday, 30 May 2014

Once more: The power of repetition

If you are a passionate photographer, you will sooner or later find that you start obsessively repeating some part of what you do, over, and over again. This is natural. It is part of the learning process, at least, it is when you try to really grok something.

At the moment, I have at least two obsessive-compulsive loops in my head. One is about understanding lines, and finding the essential elements that make an image interesting.

The result is my Whiteout series: I have taken to deliberately overexpose by about a single stop, then use an in camera grainy, high contrast B&W filter to create photos with harsh black and white, and most of the details washed away.

Repetition is the key to learning, and repeat I do. Time will tell what, and if, I learn.

When I started the Whiteout series, I was convinced nobody but me would be interested in it. As it turns out, that was wrong. The photos are much more popular than I thought they would be. Perhaps it is because of their simplicitly. They are restful, have clearly defined points-of-interest, and the drama is in the contrast, not the imagery.

The other loop that goes around in my head is different.


I am trying to build a Deep One, a monster from horror author H.P. Lovecraft's Cthulhu mythos. The photos above are all training for Horror Noir a photo project I am working on with some friends.

With the Whiteout series I do not have to do much studying. It is mostly about practicing things I already know in theory.


In addition to that, I study:
  • Painting with Light, by John Alton: A classic book about Film Noir style lighting and filming.
  • Sketching Light, The Moment it Clicks, and The Hot Shoe Diaries, are all by Joe McNally
  • How to Draw Comics the Marvel Way, by Stan Lee and John Buscema, because, we are working on a photo comic, so the more I know...
  • The Insiders Guide to Creating Comics and Graphic Novels, by Andy Schmidt, because, did I mention we are making a photo comic...
And that is just the beginning. I read, shoot, and practice with Pixelmator, because the better we do it, the more fun it will be.

You never really finish conceptual spirals like these. Instead, for every new loop, they mutate, split, or join with other spirals, becoming something new and fresh, and different, interesting, that must be explored...

Though I sometimes reach plateaus, or even regress, if I keep pushing, it'll be worth it, not for the goal, but for the journey itself.

Friday, 23 May 2014

Pixelmator 3.2 Sandstone - First impressions

I just downloaded Pixelmator 3.2 Sandstone. I did a quick test with the completely rewritten repair tool. Very impressive first results.

I'll write a more comprehensive review once I have had a chance to use Pixelmator 3.2 in a real project.

Friday, 18 April 2014

Getting Creative at the Lerum Photo Club Spring Exhibition


At my Creative Photography presentation, I talked about creative thought processes, strange loops, conceptual spirals, and how they relate to photography.
I was at the Lerum Photo Club Spring Exhibition recently. It was especially exciting for me because I was there both as an exhibitor and as a presenter. I have friends in the club, but joined quite recently, so this was my first exhibition there.

How do you get the maximum in-your-face effect with a gun and a wide angle lens? The nice thing about a good exhibition is that you can try things out on the spot. Clint Eastwood could not do it better.
For me, exhibitions are more about ideas and people than about the actual photos. Don't get me wrong, I love looking at other people's photos, and there was some really good work exhibited. It's just that I am more interested in the future than the past. The photos I exhibit are finished work, and therefore less interesting to me than the stuff I am working on now, and the things I plan to work on in the future.


You can learn a lot by watching other people in action. This may look funny, but if you want to take panorama shots where  you shoot the inside of a room, it is a quick and useful way to position yourself between shots.


There were several presentations held at the exhibition. I held two. The first was about Horror Noir, an ongoing project I run in a photography group. The objective is to create a photo comic containing a horror story based on H. P. Lovecraft's Cthulhu cycle, and shot in film noir style.

We have shot about a third of the project so far. There are still many interesting challenges ahead...


My second presentation was about creative photography. I used the droste effect, the recursive picture-in-picture effect shown above as a metaphor for theories about creativity, like John Boyd's Conceptual Spiral and Douglas Hofstadter's Strange Loops. I also talked about how creativity requires both divergent and convergent thinking.

And, of course, I delved into the process itself, how it works, and the bias against creativity, why creativity often leads to alienation.

Not lightweight stuff, but something I think most creative people can relate to.


If you were at the exhibition, you might enjoy the little slideshow above. Both conventional photos, and some creative experiments.


Friday, 21 March 2014

Tutorial: Lipstick planet


Here is the recipe for making a photo like this:

  • Find something that rises above the horizon, like a tall building
  • Wait until there is a nice sundown. (Very cloudy in Gothenburg, where I live, so this can take 3-4 months, or more.)

This is the original panorama, made from eight separate photos.
  • Shoot a multi-picture panorama.I used eight photos. Hold the camera vertically. I used a 10mm super wide angle lens, but you can do it with a longer lens too. I shot on manual with autofocus turned off.
  • Straighten the horizons, do lens correction, enhance colors and reduce noice in a good post processing program. Straighten the horizons individually for each photo, but do everything else in a batch. I used DXO Optics Pro.
  • Stitch the photos together into a normal panorama. I used Hugin for this. Hugin is free software. The user interface is rather clunky, so do look at a tutorial or two before using it.
  • Make a planet. I used the polar mapping filter in The Gimp. The Gimp is also free software.
  • Fix minor glitches. I did this in Pixelmator. I could have done it in The Gimp, but I prefer Pixelmator's user interface. I exported several versions, with different backgrounds, and different color tweaking.
That's it! By far the hardest thing I did was finding a decent sunset. Those are few and far between here in Gothenburg.

Note that you do not need as many different programs as I used. You can do everything in The Gimp and Hugin, and they are both free.

Monday, 3 March 2014

Going blue: A cool white balance trick


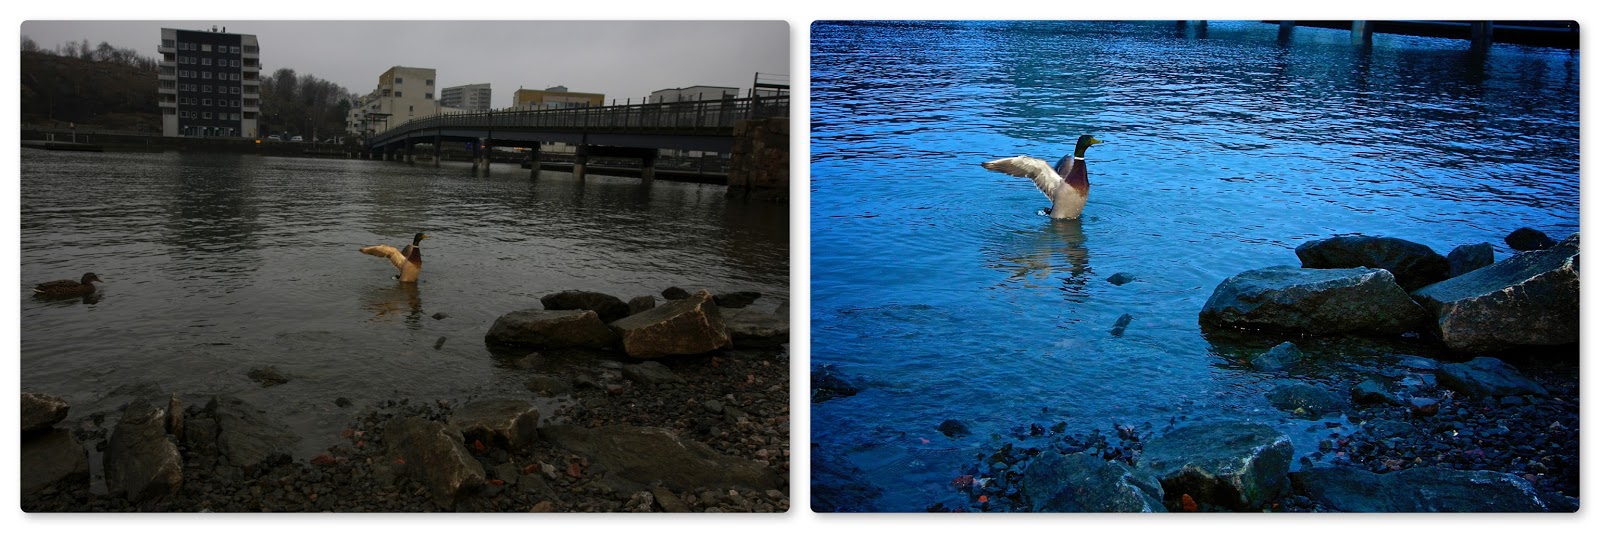
I got the shot above at a recent photowalk where we visited the East India Man Götheborg. I used a Sigma 10-20mm super wide angle zoom while on the ship, and I left it on for the rest of the walk.

Yes, I know, most people use slightly longer lenses for nature photography, but, as they say, the best lens is the one you have with you.

Click on the photos to see a larger side-by-side comparison

Because the original, unprocessed photo looks so different from the finished version, it might be interesting to have a closer look at how I did it.

Getting the shot

This was a photowalk, and I was by no means the one to discover the bird. There were a couple of people shooting it when I arrived. Everyone used sane lenses of course, and could photograph the bird without startling it.

I knew could not do that. I had to get a lot closer. I would almost certainly startle the bird, so I probably would not get more than one shot. On the other hand, if the bird raised its wings, it could be a fairly good shot.

Lucky for me, I had decided to shoot outdoors with a hotshoe flash, and I had put a full CTO (Color Temperature Orange) gel on. Gothenburg can be incredibly gray, and I wanted to warm my photos up quite a bit.

I waited until the other photographers had gotten their shots (at least I want to believe I did...), zoomed my lens out to an awsome 20mm, and then slowly walked towards the bird. I had my camera in one hand, and my flash, on maximum power, in the other.

It worked perfectly. The duck started flapping its wings, and I took the shot. As you can see in the original, unprocessed version, the flash colored the bird orange, but did not do much with the drab, gray surroundings.

Post processing: Bringing the color out

I shoot in RAW format most of the time. This has several advantages. One of them is that I can change the white balance after I have taken the shot.

I imported the photo into Aperture. The first thing I did was changing the white balance. I set the White Balance adjustment to Natural Gray, and clicked an orange part of the wing.

Bang! The photo changed color dramatically. Suddenly, the water was blue.

Looks like magic, but it is not. I colored the bird wing orange with my CTO gelled flash. Orange is a combination of red and yellow.

What I told Aperture to do when I clicked on the wing was to make the orange wing gray. How can Aperture do that? By reducing the red and yellow to the same level as the blue component.

What happens in the gray parts of the photo? Well, the red and yellow get reduced there too. What's left when you remove a lot of red and yellow? A lot of blue is left.

Hence: Blue water with normally colored duck.

I did some minor fixes, like removing a bit of residual orange from the wing, and making the beak a bit more orange by painting it with a saturation brush. I also added a vignette, increased overall Saturation and Vibrancy, and sharpened the photo a bit.

Not to forget, I cropped it as heavily as I dared, to bring the duck a bit closer. As you can see, I followed the rule of thirds convention.

I did more small lighting tricks during the photo walk. I'll write about them in forthcoming posts.

Sunday, 2 March 2014

A different kind of photo walk: Aboard the East Indiaman Götheborg

Three sailors. Bottom left, first mate August Jansson, at the top, Woody Wiest, and right, Madléne Hjelmroth.
I was on a different kind of photowalk in Gothenburg. I was lucky to be one of ten photographers allowed on board the Swedish Ship Götheborg.

Götheborg is a replica of the 18th century Swedish East India Man with the same name. The original ship sank near its home harbor in Gothenburg in 1745. Check out the Wikipedia page if you want more facts about the ship.

Peter Sandin, Madléne Hjelmroth, and Daniel Sjöström created the A Different Kind of Photowalk group, and this was the first event.

On deck. Götheborg sails with a crew of about 80 people. The original sailed with about 130. Travelling was high risk, so the ships had to have extra crew on board.
I used a Sigma 10-2mm lens for all the shots in this post. This is a great lens for shooting in confined spaces. It's also great for shooting the deck of a sailing ship. I knew I would not be let up in the rig, at least not this time around, so I brought a monopod for hoisting my camera up into a higher position, which made for more interesting photos of the deck.

If you get an opportunity to shoot on Götheborg, which you may, since she is travelling all over the world, shoot details. There is so much interesting stuff aboard you could spend weeks there with a camera.

I shot the ships wheel through a skylight. I dried some water drops off, and then held the lens very close to a glass pane in the skylight.

The gun deck
The gun deck was interesting. It was also very dark, so I lit it with two remote triggered flashes. I had full CTO gels on to match the color and tone of the light inside.

This little tableau was interesting. Beautifully done. Also a reminder that lunch time was drawing closer...


The cannon shot was interesting. I wanted the cannon to pop out from the background, so I put a flash in front of it, i.e. on the side closest to the gun port, and aimed it against the wall. I held a second flash above my head, and aimed it down.

I then took a few shots, varying the strength of the flash in my hand, to get a good balance between the two light sources.

Of course there are some modern amenities on the ship, like this sewing machine.


Woodie Wiest, our guide, took us to see the workshop on the pier.


Tools and stuff everywhere. Very neat and orderly, at least compared to a photo shoot...


After the tour, Madléne, who is one of the photowalk organizers, gave Woody some very well deserved tickets to the Opera.

The last shot of Götheborg...for now.
After the tour the lucky ten joined up with the rest of the photographers who would go on the walk at a café. While most of the others had coffee, I had an incredibly large pizza.

The rest of the photowalk was great too. I'll post more about it, and show off some very nice pictures.

A very large Thank You! to Woodie Wiest, Peter Sandin, Madléne Hjelmroth, and Daniel Sjöström, who made it possible to shoot on the Götheborg!

Also a big Thank You to everyone else who had joined the walk, and made it a memorable and fun experience.

Wednesday, 26 February 2014

At the Soulstore: A one light setup for shooting a store

Mattias at the Soulstore. Note how Mattias is lit by a remote triggered flash, while most of the store is lit mainly by ambient light.
I have shopped props and other things for the Horror Noir project from the Soulstore in Gothenburg. When I was there today, I asked Mattias, the proprietor, if I could take a photo for our behind-the-scenes photo comic.

I wanted to light Mattias, so attention would be drawn to him in the photo. I placed a single hotshoe flash behind one of the books in the pile on the right side of the picture. I put a 1/2 CTO gel on it and zoomed it to 105mm to narrow down the beam of light.

Shooting a store is a job for a wide angle lens, of course, so I used the Sigma 10-20mm at 10mm. I mounted the camera on a monopod, set the self-timer, and hoisted it high in the air.

I took a couple of shots without triggering the flash, to set the ambient light level. Then I turned the flash remote trigger on, and took the shot. I took a couple of more shots with slightly different settings to be on the safe side, but I liked the first shot best.

I did the post processing in Aperture. This included some cropping, because I wanted to zoom in on Mattias a bit.